페이지

2010년 11월 29일 월요일

인덱스패스로 셀 찾긔

NSIndexPath *firstIndexPath = [NSIndexPath indexPathForRow:1 inSection:1];
UITableViewCell *cell = [[self tableView] cellForRowAtIndexPath:firstIndexPath];

2010년 11월 14일 일요일

Declared Properties

header file에서 @property 선언은 getter/setter가 구현되있음을 알리는 것이고, implementation에서 @synthesize는 이것을 자동으로 구현해 주는 것이다. @synthesize를 사용하지 않으면 직접 구현해주면 된다.
@property class명 instance명;
여기서 @property와 class명 사이에 () 안에 ,로 구분지어진 속성을 넣을 수 있는데
Writability에 관한 : readwrite, readonly
Setter Semantics에 관한 : assign, retain, copy
Atomicity에 관한 : nonatomic, atomic
getter/setter naming에 관한 : getter=getterName, setter=setterName
이 있다.
Markup and Deprecation 또한 지원한다.
예를들자면

@property CGFloat x
AVAILABLE_MAC_OS_X_VERSION_10_1_AND_LATER_BUT_DEPRECATED_IN_MAC_OS_X_VERSION_10_4;

이런 식,
IBOutlet 또한 선언할 수 있다. (formal part는 아님)

위에서 @synthesize로 자동구현한다고 했는데 @dynamic도 사용할 수 있다.
property=ivar to indicate that a particular instance variable should be used for the property!
즉 ivar이라는 instance variable이 property로 사용된다는 얘기


@synthesize firstName, lastName, age = yearsOld;

예를들면 이렇다.
@dynamic의 경우는 getter/setter method가 동적으로 (파일 임포트라던가?) 로딩될 때 사용한다. 반드시 어디서 구현되있는지 프로그래머가 알고 사용해야 에러가 나지 않겠쬬
(Core Data 를 사용할때에는 NSManagedObject가 관리하기 때문에 property들의 getter/setter method를 구현할 필요는 없지만 propoerty를 사용한다면 @dynamic 으로 선언해줘야한다.)


Copy

If you use the copy declaration attribute, you specify that a value is copied during assignment. If you synthesize the corresponding accessor, the synthesized method uses the copy method. This is useful for attributes such as string objects where there is a possibility that the new value passed in a setter may be mutable (for example, an instance of NSMutableString) and you want to ensure that your object has its own private immutable copy. For example, if you declare a property as follows:
@property (nonatomic, copy) NSString *string;
then the synthesized setter method is similar to the following:
-(void)setString:(NSString *)newString {
if (string != newString) {
[string release];
string = [newString copy];
}
}
Although this works well for strings, it may present a problem if the attribute is a collection such as an array or a set. Typically you want such collections to be mutable, but the copy method returns an immutable version of the collection. In this situation, you have to provide your own implementation of the setter method, as illustrated in the following example.
@interface MyClass : NSObject {
NSMutableArray *myArray;
}
@property (nonatomic, copy) NSMutableArray *myArray;
@end
@implementation MyClass
@synthesize myArray;
- (void)setMyArray:(NSMutableArray *)newArray {
if (myArray != newArray) {
[myArray release];
myArray = [newArray mutableCopy];
}
}
@end

* 아래는 그냥 이점~
Declared properties address the problems with standard accessor methods by providing the following features:
  • The property declaration provides a clear, explicit specification of how the accessor methods behave.
  • The compiler can synthesize accessor methods for you, according to the specification you provide in the declaration. This means you have less code to write and maintain.
  • Properties are represented syntactically as identifiers and are scoped, so the compiler can detect use of undeclared properties.

Your First iOS Application

간략히 정리를 해보고 찾기힘든 링크들 정리 @_@
- 어떤 UIViewController를 application과 동일한 lifetime을 가지게 하고싶다면 application delegate의 instance로 선언하면 된다. 자세한건 > Memory Management Programming Guide
단순 UIViewController의 subclass를 instance 변수로 선언해두면 어떤 class를 사용할 것이라고 미리 선언해주어야 하는데, header파일을 import해도 되지만 이렇게 미리 import할 필요 없이 사용할 클래스명만 미리 선언해서 에러가 없도록 해주고 이 클래스 어디선가 쓰인다는 메시지만 전할 수 있다. 이를 forward declaration이라고 하며 @class와 같이 설정한다.
( 이 방법은 두 클래스가 서로의 header파일을 참조해야하는 circle이 생기는 것 또한 방지해준다. 그러므로 header file의 import는 .m 파일에서하고, header file에서는 forward declaration만 사용해야 하겠죠??)
Resource Programming Guide
Memory Management Rules
Accommodating Multitasking.

2010년 11월 10일 수요일

libxml 라이브러리를 참조하는 방법

/Developer/~의 절대경로를 쓰고싶겠지만 이것을 Header Search Paths에 추가해봤자 참조되지 않는다!
그것은 바로가기일 뿐..
방법은 /usr/include/libxml2를 추가할 것 (Mac에 존재하는 path란다.)
이것은 framework와 다르게 .dylib파일이므로, 저렇게 프로젝트에 더한후 Header Search Path를 추가하는 작업이 필요하다.
흑흑.
아래는 stackoverflow에서 줏은 답변의 원문

Form the link of @Matt Ball,
I found following helpful to me.
You need to add libxml2.dylib to your project (don't put it in the Frameworks section). On the Mac, you'll find it at /usr/lib/libxml2.dylib and for the iPhone, you'll want the /Developer/Platforms/iPhoneOS.platform/Developer/SDKs/iPhoneOS2.0.sdk/usr/lib/libxml2.dylib version.
Since libxml2 is a .dylib (not a nice friendly .framework) we still have one more thing to do. Go to the Project build settings (Project->Edit Project Settings->Build) and find the "Search Paths". In "Header Search Paths" add the following path on the Mac:
/usr/include/libxml2

2010년 11월 9일 화요일

OAuth


OAuth란?

Open API를 사용하기 위해선 인증이 필요합니다.

인증방식의 표준이 없기 때문에 제 각각의 방법으로 개발되고 있는 실정인데요

구글의 AuthSub, AOL의 OpenAuth, 야후의 BBAuth

OAuth는 제각각의 인증방식을 표준화하고 가장 좋은 방법만 가져다 만들었습니다.

즉 매쉬업 서비스로 만들어진 어플리케이션이 다른 어플리케이션의 사용자 정보를 접근할 수 있는

표준화된 방법을 제공하는 스펙입니다.

OAuth 인증방식을 이해하기 위해선

용어를 미리 숙지하셔야 합니다.

◦ 서비스 프로바이더(Service Provider) – OPENAPI를 제공하는 서비스를 말합니다
◦ 사용자(users) - 서비스 프로바이더 혹은(그리고컨수머를 사용하는 이를 말합니다
◦ 컨수머(Consumer) – API를 사용하여 개발된 애플리케이션 서비스를 말합니다.
◦ 보호된 자원(Protected Resources): 서비스 프로바이더에 존재하는 사용자의 데이터를 의미합니다.
◦ 컨수머 개발자(Consumer Developer) : 컨수머를 개발하는 개인 혹은 단체
◦ 컨수머 키(Consumer Key) : 서비스 프로바이더에게 컨수머 자신임을 인증하기 위한 키
◦ 컨수머 시크릿(Consumer Secret) : 컨수머의 컨수머 키 소유권한이 있는지 인증하기 위한 키
◦ 토큰(Tokens) – 컨수머에서 서비스 프로바이더에 있는 사용자의 보호된 자원에 접근하기 위해 사용되는
                       사용자의 인증정보입니다.

  리퀘스트 토큰(Request Token) :  컨수머가 사용자에게  접근권환을 획득하는 과정에서 사용하는   
                                               값이며, 이것은 차후 액세스 토큰으로 교환됩니다.
  리퀘스트 토큰 시크릿(Request Token Secret) :  리퀘스트토큰이 사용자의 것임을 인증하기 위한
                                                                 값입니다.
  액세스 토큰(Access Token) : 컨수머가 사용자의 서비스 프로바이더를 통해서가 아닌 컨수머를
                                          통해서 보호된 자원에 접근할 수 있는 권한을 받기 위한 값입니다.
         ▪  액세스 토큰 시크릿(Access Token Secret) : 액세스토큰이 사용자의 것임을 인증하기 위한
                                                                      값입니다.

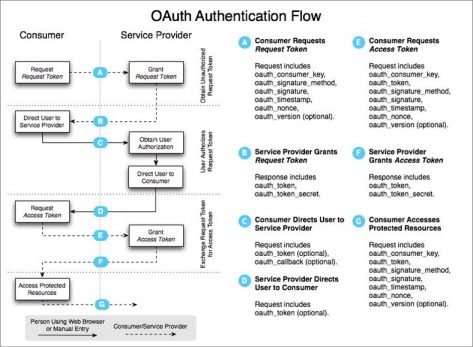
OAuth 인증방식의 흐름도입니다.


OAuth 인증 방식에는 7가지의 인증과정으로 이루어져 있습니다.

A; Consumer가 Request Token 요청
B; Service Provider가 Request Token 발급 
C; Consumer는 사용자를 Service Provider로 이동사용자를 인증하고 토큰 발급을 확인함
D; Service Provider는 사용자를 Consumer로 이동 
E; Consumer는 Access Token 요청 
F; Service Provider는 Consumer의 신원과 Request Token 확인Access Token 발급
G; Consumer는 Access Token으로 사용자 정보에 접근

끝으로 관련 사이트입니다.


현재 오픈마루에서 OAuth 인증방식을 지원하고 있습니다.


OAuth 인증 관련 예제


출처 : Naver OPEN API 공식CAFE